As a family, we hoard collect things. As Disney People, we tend to collect Disney things in particular.
As far as Disney collecting goes, Raymond favors pins and watches, Megan, clothes and purses, I like Disney kitchen and home goods and Joseph – well, Joe’s a collector of a different sort.
Disney Collectibles – Lunchboxes
Joseph can best be described as an “old soul”. He sprang from the womb as a wise and worldly little guy with a particular passion for antiques. This took a bit of adjustment on our part – as a mother, who really expects their four year old to kiss them on the forehead and say, “You’re a lovely girl”? Or ASK to go antique shopping in the first grade? Joe was an American Picker long before we’d ever heard of Mike or Frank or Antique Archaeology. Once our little antique collector could read, Raymond taught Joseph how to search for items on ebay and, with a little adult supervision, bid on treasures he was interested in owning. Most of the time, that meant Disney collectibles.
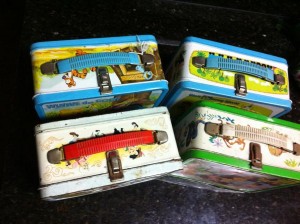
Among his first ebay purchases, Joseph chose (over several months) four Disney lunchboxes. To a guy born in 1995, cool stuff from the ’70’s was really old! I believe the price he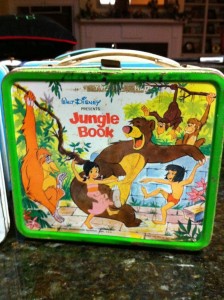 paid for each was in the $8 to $10 range and the lunchboxes were all missing their thermoses. I had quite a time explaining how brokenhearted a grade-schooler in the ’60’s and ’70’s was when their thermos shattered, ruining the hot soup or cold milk accompanying their sandwich that day – seized by a teacher when the telltale rattle was heard from inside the thermos’s broken interior – and coldly, unceremoniously, chucked in the trash. The sadness was nearly indescribable. Yes, why indeed, did they allow children to carry liquids to school in such a fragile container – covered in beloved cartoon characters? I didn’t have a satisfactory answer for that.
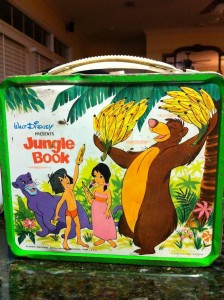 The oldest in Joe’s collection is the Jungle Book lunchbox. Dating from 1968, it features Baloo and King Louie with Mowgli and Shanti (originally called only “The Girl” until Jungle Book 2) and some monkeys on the top. Baloo, Mowgli, Shanti, and Bagheera on the bottom. It’s a little dented and scratched, but the colors are still bright. Really, it looks pretty good for 45 years old!
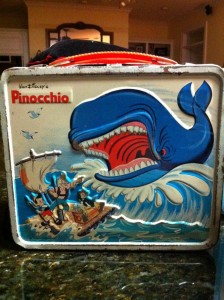
Next in age, is the Pinocchio lunchbox from 1971. This one’s the most worn, but still has good colors and detail. The top features Pinocchio and Jiminy Cricket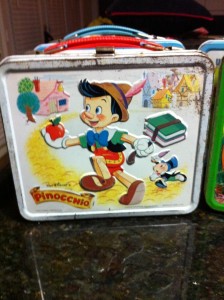 heading off to school. The bottom features a very angry Monstro, the whale that swallows Geppetto, Figaro, and Cleo in the movie. Trivia tidbit for you – Monstro was voiced by Thurl Ravenscroft (“You’re a mean one, Mr. Grinch…”). On the bottom’s lower left corner, Pinocchio, Geppetto, Figaro, and Cleo are shown fleeing Monstro on a raft. Cleo, especially, is hard to make out due to wear and rust.
The final two lunchboxes both date from 1976 and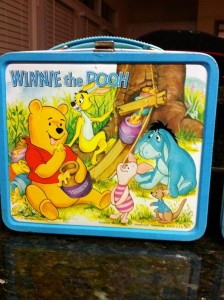 are in the best condition.
The Winnie the Pooh lunchbox features Pooh enjoying some honey and hanging with his buddies from the Hundred Acre Woods (Rabbit, Eeyore, Piglet, and Roo) on the top and Kanga joins the gang on the bottom as poor, sad Eeyore hauls a cart of 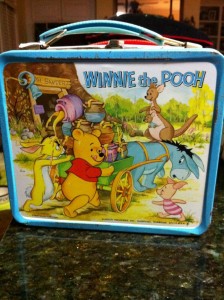 honey jars.
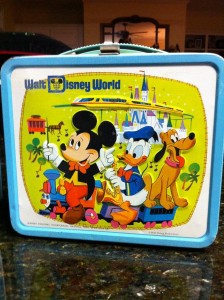
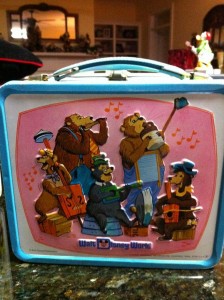
Last but certainly not least, Joseph (wise beyond his years) scored a Walt Disney World lunchbox in great condition. Mickey and the gang, riding the Disney World Railroad, are featured on the top along with iconic Disney World theme park images (Cinderella Castle, Monorail, Main Street Trolley). The bottom is the best! Country Bear Jamboree in all its original glory! I don’t know about Joe, but this one’s my favorite. Do you suppose he’d mind if I started using it to take my lunch to work?
Like this:
Like Loading...
 On this Thanksgiving Day, I just want to take a minute to say thanks to you (and I’m thankful for you!) My little Disney blog is now a month old. I’ve managed at least a post a day and you have followed along, helping me reach nearly 100 Likes on my Facebook page (and 260+ twitter followers @life_of_green). Many of you have encouraged me daily and several of you have liked, shared, tweeted, and pinned over and over again.


 The oldest in Joe’s collection is the Jungle Book lunchbox. Dating from 1968, it features Baloo and King Louie with Mowgli and Shanti (originally called only “The Girl” until Jungle Book 2) and some monkeys on the top. Baloo, Mowgli, Shanti, and Bagheera on the bottom. It’s a little dented and scratched, but the colors are still bright. Really, it looks pretty good for 45 years old!


